Thursday, August 30, 2018

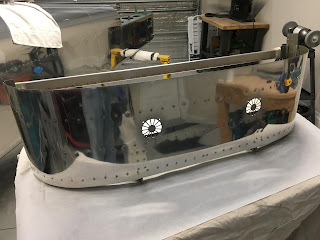
Fun with fiberglass (not...)

Sanding, filling, sanding, filling, sanding etc...   

Pretty happy at this point with the fairing.  I spent a LOT of time shaping it and fussing over little voids/pinholes.   I put a "final" coat of resin on surface today.  Hopefully this will sand out smoothly tomorrow and then get a couple of coats of filler primer.   I thought today would be that day of course but I needed to do more work.  Spent quite a bit of time making sure the edge along the top is perfectly level with the tape, and an equal amount of time feathering out the edges forward.


Tuesday, August 28, 2018

Initial sanding of canopy fairing

Coming along - initial sanding down to tape (I removed the first of three layers of tape after initial sanding).


Monday, August 27, 2018

Canopy void filler & fiberglass layup

Late last week I completed the "void filler" section of the canopy.  Using tinted micro-balloons in epoxy.  This went pretty well.  I "retouched" a couple of spots to make it a little better.

After completing sanding of the void filler I started the fiberglass layup - one long session starting with tinted pieces followed by successive strips/shaped pieces to fill out the shape.  The front part went pretty much according to the plans.  I did some extra strips/pieces on the side to fill in the area below the canopy - probably overdid this but I'd rather sand down than build up this area. 

Final step was applying "peel ply" (dacron fabric I bought on ebay or somewhere).   I'm generally pleased with results but will know more when peel ply comes off and sanding begins....

Void filler completed:


 Initial tinted fiberglass layers:


Peel ply in place:  


Tuesday, August 21, 2018

Canopy assembly, photos of panel and engine under construction

Completed riveting of canopy side skins and loose attachment of screws to canopy sides.,   Attached the seal retention strips to top/inside of canopy.

Got photos today from Steinair and Lycoming of engine and panel in progress.  Jeff at Lycoming could use a better phone camera! Confirmed that n-number will be 14VB. 


Monday, August 20, 2018

Canopy coming together - literally

Since last post, I spent quite a bit of time cleaning up the shop.  Takes more time to clean up than mess up for sure.

I marked and taped off the area for the canopy fairing a couple of days ago.

Yesterday,  I cleaned out the fuselage and put in some edge guards on all the exposed stiffener and longeron edges in the cockpit and baggage area.

Today completed fitting of canopy to structure, sanded the canopy fairing area mercilessly with 80 grit sandpaper, fussed with fit of canopy to canopy side skins:  I ended up making a small shim for the aft-most hole on the right side because there is too much gap there to tighten the screw without bending/stressing the canopy itself.  Easy to make a shim about 1/2" by 1/2" that won't show externally but will ease the gap and thus the stress on the part.  The first layer of tape (on canopy and skin) is orange.  I added blue and black layers to give myself a little extra protection plus a more defined edge for the fairing. 

I'm very close to the big fairing fiberglass experience....


Saturday, August 18, 2018

Canopy final fitting steps

Continuing to refine fit of canopy, also painted the glareshield flat  black.   Countersinking holes for side skins and aft canopy structure screws.   Completing prep of canopy side skins and shims (I am using shims since the thickness of the canopy is less than 0.17".   Touched up paint on the canopy frame where I rubbed it taking the canopy on & off repeatedly for fitting.  I will do the rub strips and seal preparation before I re-fit canopy to the structure and start the canopy fairing.   So far this section has been lots of little steps but has gone reasonably well.  I continue to be impressed with how well everything comes together.  This is a reflection on Van's, not me....


Thursday, August 16, 2018

Still working on canopy

Coming along nicely.  I've fitted the canopy to the forward structure a bit more completely, also drilled the canopy to the structure today.   Getting very close to the fun fiberglass stuff...


Tuesday, August 14, 2018

August 14 Update

I finished general fit of canopy frame and have been working on fitting the canopy itself.  Had a few questions about positioning the canopy: the best fit seems to be with the canopy about 1/8" forward of the "forward canopy line".   I discussed with Vans and with Vic Syracuse and I've decided to go with my gut: I'll work from the slightly forward position as this gives the best fit on the back and sides.  I don't think anyone will notice the slight difference in position versus other RV-14's.  There is a gap between the canopy and the "slot" in forward canopy skin when positioned per Van's line: my position closes the gap and also gives a nice fit in back so that the canopy "as is" needs no trimming to clear the rear window.

I decided to do something a bit different today - waiting for a couple of items I ordered before moving ahead on the canopy.  So I put together the seat frames.  I will be using Classic Aero seats which come with a frame but I thought these would come in handy while working in the airplane.  I can sell them down the road or keep them for possible future use.


Monday, August 13, 2018

Canopy frame mounted to fuselage

Canopy frame attached to fuselage.  A few fit issues that I'm working through:
  • I had to remove (using scotchbrite pad on angle grinder tool) a very small amount of skin near the hinges and the very center of the forward canopy to relive slight interference at front edge of canopy.  Also removed some excessive sealant from when I completed forward fuselage structure.  Fits nicely now.
  • some rubbing of pin blocks on rivets (adjusting by removing material a little at a time to clear these)
  • center of aft canopy frame where it sticks out just a bit is rubbing a bit on the way up/down.  I'll remove just a bit of material here.
  • there was slight rubbing of the aft canopy rail on the rollover bar which I adjusted already.  This required a bit of "encouragement" but once done was easy.
  • left forward corner of canopy stands slightly proud of fuselage skin.  I adjusted skin slightly here but I think I may have to use a small amount of body filler to make this seamless.  
I was very anxious about "twist" given all the emphasis on this in the canopy frame assembly instructions but I don't see any evidence of twist - the overall alignment is very good considering the complexity of assembly.   You have to be impressed with Van's overall design when two complex structures built separately line up this well.


Saturday, August 11, 2018

Moving along on canopy

I've completed riveting all the forward canopy structure and canopy side rails to front structure.  Next step will be riveting the aft canopy frame to this and then attaching this structure to the front canopy hinges.   Exciting stuff!


Friday, August 10, 2018

Canopy progress

After all the steps and prepping parts: Finished riveting the forward canopy skin to the substructure.   Now will fit the "close out" (final drill) and rivet it.   I'm very pleased with both my riveting (OK I had to drill out about 4 rivets) and the "twist" at this point.  Down to .1-.2 degrees.  I don't think I can do much better than that.   I have also completed the rear "bow" and side rail prep so the rest of the canopy structure will go together very quickly.